Installing the IE7 Developer Tools for Spoon.net

I have been using spoon.net for quite a while for my cross browser testing needs.  One thing that seemed to be lacking was the Developer Tools in IE7.  IE8 and IE9 both had the developer tools out of the box so they were easy to find using spoon.  I assumed getting the tools added to IE7 would not be possible since it was originally a separate download from Microsoft.  Not so!  Since (as I understand it) spoon installs a comparability shim onto your computer for things that are no longer supported but uses most of the resources of your local machine, you can install the IE7 developer tools and the spoon browser will allow you to use them. 

Install Procedure

Download the ie7 developer tools from here.  It says it requires Windows XP but installs fine on my Windows 8 Box.

On the downloaded file right click, choose properties, and unblock on the downloaded file

Install the application (this requires admin rights)

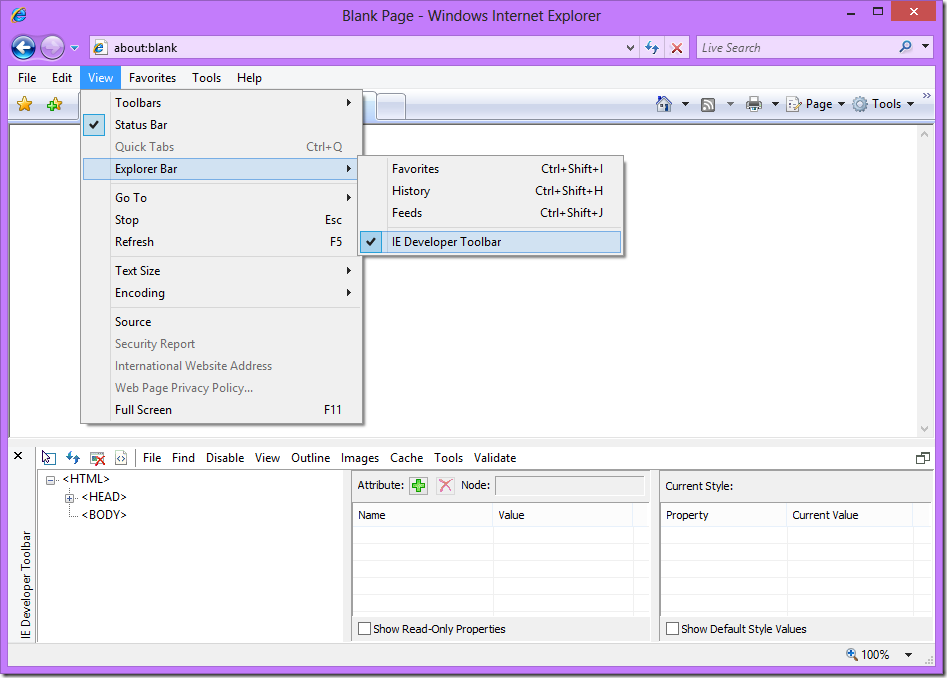
Launch IE7 from Spoon and you can activate the tools by going to the following menu: View->Explorer Bar-> IE Developer Toolbar

Toolbar Location

Happy Testing!

Nissan Altima Key Testing

My wife was recently in a car accident (thankfully no injuries) which resulted in us using a Nissan Altima for a few days while her car was in the shop.  It has a remote key and start button combination that allows you to unlock the doors with a small button on the drivers or passengers side doors and to start the car without removing the key from your pocket.  For Day to Day use this is really nice since you don’t have to fiddle with your keys when its raining or cold.  I did have some specific questions about what the limits of the technology were so I devised a couple of simple tests. 

Here are the questions I was trying to answer. 

How close to you have to be to unlock the car?
How close do you have to be to start the car?
What happens when you remove the key after the car is running?

Testing Setup

I placed a tape measure on the ground measuring our ten feet (about 3 meters) from the drivers side door.  I placed the key on the ground next to the tape measure so I could get some accurate observations.  The setup is pictured below.


Testing Setup

How close to you have to be to unlock the car?

I started with the key at 10 feet and moved the key toward the car 1 foot until pressing the button on the drivers side door unlocked the doors.  At 3 feet the doors began to unlock consistently so I moved the key back to 3.5 feet.  At this distance the doors will unlock about 1 our of 20 times. 

How close do you have to be to start the car?

Since the key was already at 3 feet that is where I started attempting to start the car.  I continued to move the key 1 foot a time toward the car until I had the key placed under the drivers seat on the ground (I guess this is technically –1 foot since the tape ended at the car door).  None of these placement would allow the car to crank.  Once the key was physically in the car it cranked just fine. 

What happens when you remove the key after the car is running?

This test had a different setup.  I cranked the car with the key in my pocket and then handed the key out the window to my wife.  I drove to the end of our road and back (about 1/4 mile) and got no warnings or unexpected behavior.  However when I returned to our driveway I opened the car door without turning off the motor and got a “No Key” warning on the dash.  Apparently the key check is only triggered when the drivers door is opened. 

Summary

The whole system seems to be pretty nice and reasonably secure from a proximity perspective.  I have not done any research on the technologies used in the system so I cannot comment on their general security.  The only oddity I have seen is no apparent way to turn on just the accessories of the car.  I am sure there is a way to but its not obvious how.

Comparing Efficiency of Two SQL Commands

I am often working on SQL Server as my database backend.  When trying to determine how efficient two different database queries might be I find it helpful to use statistics available to determine hard performance numbers instead of gut feel or using my trusty stop watch.  When you run a query you get the two tabs shown below.  


Blank Info


The messages tab usually does not have much information but you can change that with two simple commands.   If you run the following two commands in your query window the messages tab will contain a lot more information about the resources your query required to complete. 

SET STATISTICS IO ON
SET STATISTICS TIME ON

After running the same simple “select * from tablename” query as above you get the following results.

Stats Info

There are three parts of this I often use.

1. Scan Count

This gives you the number of table or index scans that were required to complete the query.  In this case a single table scan is expected since this is pulling all data from a single table and there are no indexes on the table.  If this number is large it can be an issue in performance.  If this is the case I normally switch to looking at the execution plan, but that is for another blog post. 

2. Logical Reads and Physical Reads

These numbers tell us either the number of reads made to the storage device (physical reads) or the number of reads that would have been made to the storage device if the data had not been cached (logical reads).  In this example the table was already in RAM on the SQL server so all the reads were logical. 

3. Elapsed Time

This is my favorite number since it gives me the ability to compare sub-second queries to each other.  The example took 442ms (.4 seconds).  If you had a query that was doing the same thing but took 800ms it would be pretty easy to choose from them. 

How to use these numbers

There are no absolute right and wrong numbers to see.  Generally lower is better but there are times when scan count might be high but performance is not affected.  You might see a query where the CPU time is greater than the elapsed time.  This generally means the query is CPU intensive.  This is also not necessarily a bad thing, just something you want to be aware of.  Hopefully these commands will give you a little more information about your queries so you can make good decisions. 

Nokia Lumia 900 Review

So I decided to upgrade from my iPhone 3GS and pickup the Nokia Lumia 900.  So far I really like the phone.  I will try and breakdown some of my impressions below.

Hardware

Screen

The first thing I noticed was the screen.  The colors are vibrant and at 4.3 inches there is a lot more real estate than on my old iPhone.  I thought the screen might be too big, but it’s size is just right. 

Dedicated camera button

I am pretty certain the latest version of iOS had this as well, but I did not dare upgrade my phone for fear it might become so slow I would not be able to use it.  I use this mainly for waking the phone up quickly to try and catch pictures of the kids. 

Back Button

I got a chance to play with a first generation Samsung Focus for about a week and the back button would occasionally be pressed by my palm as I was trying to use the phone.  I have not had that issue at all with the Nokia.  I am also a fan of the quick app switching when you hold the back button down.

Search Button

This gives you quick access to bing.  I normally use the vision and music parts of the apps to scan barcodes or identify music that is playing.  Having this built in removes the need for something like shazam. 

Camera

The camera takes good pictures for camera phone.  Exposures in daylight are good, indoors is another story.  I know the specs are amazing for the camera, but for me you just can’t beat a dedicated device.

Duel LED Flash

This is pretty useless as a flash for the camera.  It always overexposes the shots and darkens the backgrounds.  However, as a flashlight, the LEDs are great. 

Apps

Scott Hanselman has a great article on the apps he can’t consider switching phones without.  My daily list of apps is much smaller, but I have not found anything that I really needed and could not find a solution for. 

Authenticator

This is google authenticator for Windows Phone.  It’s a third party app but works fine for everything I have tried it with. 

Contact Sender

After being an iPhone user for quite a while I was surprised this was not built in.  There is no convenient way to bundle up all phone numbers, addresses, etc for a person and send it over either sms or email.  Contact Sender should have been part of the base OS.

Nokia Drive

Nokia Drive is great.  It allows you to download maps while you are on wifi so you don’t have to eat up your cellular data when using the GPS.  I don’t think I will be needing my Tom Tom anymore.  This is just as reliable and the maps are up to date without the hassle associated with a stand alone GPS. 

Rowi

Awesome twitter app.  Remembers the last tweet I read so I know where to start from, runs quick, and have nice animations.  This is the app I show off when friends want to see my new phone. 

Viperal Tasks

This connects and syncs with toodledo.com  It’s the online todo system I use for organizing my GTD tasks.  So far so good.  I was glad to find this since the toodledo mobile website still has room for improvement.

Cases

My wife and I both got this phone on the same day.  She is a case person and I am not.  We were able to find a lot of case choices on Amazon but very few in our local best buy.  This is not really surprising based on current market share.  We ended up ordering two cases one solid and one gel.  So far the gel case is winning out. 

Summary

I think the phone is great.  My wife is still getting used to it.  We will see how she feels about it in the long run.  Anyone else take the plunge?
Microsoft LifeChat LX-3000 Headset Review

tl;dr: There are inexpensive and really nice.  Get a pair for yourself. 

From time to time I have been known to play an online video game or two.  I decided it was time for a proper VoIP headset for gaming and making Skype calls.  I was looking for something that had long term wearability, complete ear coverage, inline volume and mute buttons, and an adjustable mic.  It turns out you can spend a lot of money on a headset if you want to.  That’s not really my style for a first time purchase so I set out to find a reasonably priced model that met all my criteria.  A few weeks earlier at work we purchased a Microsoft LifeChat headset for a project we were working on.  We kind of happened into it since we were in a hurry to get a headset and that was the best looking option staples had on the shelf.  I checked with my friend who was using it and she was pleased so I did a little more research.  The Amazon reviews were acceptable but not outstanding, newegg’s reviews were a little better.  Since the price was about 1/3 of other available headsets I decided to take the plunge.  Here is a picture of the whole setup. 

Overview

Wearability

I give these 4/5.  I have worn them for up to several hours only having discomfort one time I can remember. 

Ear Coverage

I think 5/5 here.  They cover the whole ear and block out outside noise well, but not to the point I can’t hear important things going on around me.

Inline Buttons

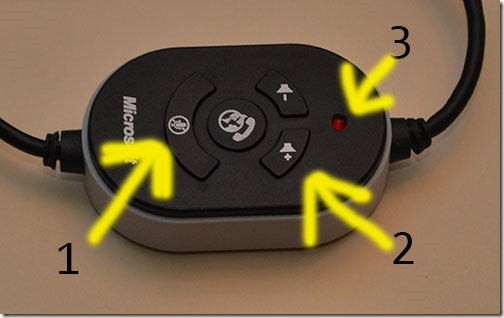
3/5.  All the required buttons are present and work out of the box.  The mute button (#1) works great.  The volume buttons (#2) are a little slow to react, but I find that common on USB keyboard volume buttons as well.  Then there is the live call button.  It starts an app on the computer when you press it.  I would be happier if they had left this off.  As a bonus feature, there is a mute indicator light (#3) that turns on when the mute is pressed.

Buttons

Adjustable Mic

5/5.  Works well and you can move it out of the way when you just want to use the headphones. 

Summary

I have been really happy with these since they arrived.  They were no trouble to setup and have been very reliable.  Since this is my first set of USB headphones I was not sure if there would be any issues switching between them and the normal speakers on the computer.  This has proven to be seamless.  I would certainly recommend these to a friend. 

Who is that Guy at the Top of the Page?

It’s Vulcan.  

I am from Birmingham, Alabama and the statue is part of local lore.  He is located on Red Mountain which divides the downtown area with the southern suburbs.  The big joke is since he faces downtown his rear end is what you see when you are in Homewood just south of Red Mountain.  

Why is he up there?

I was inspired by Scott Guthrie’s Blog which has an image of a notable piece of skyline from Seattle.  It seemed appropriate to use a notable piece of skyline from my home town.  

Note: I realize if I change the theme of the blog this post might not make sense.  I promise to keep a picture of him around if that happens.  

Programmatically Updating App.config in Console Applications

Do you remember ini files?  They seemed so easy to use in the old days.  I think what was most appealing about them was the ease with which you could read and write to them either programmatically or in a text editor.  I still use this simple configuration pattern for console applications where a full database is too much to setup and I don’t want to use the registry because it stores settings in a different place than the exe file.  Below are some notes on how I use the .net ConfigurationManager class to accomplish this.

Reading Configurations

Reading configurations works the same way for console, WinForm, and asp.net apps.  They all automatically load either the app.config or web.config associated with the application.  Below is a sample appSettings section of a config file.

<appSettings>
    <add key=”lastRunTime” value=”8/16/2011 10:05:20 PM”/>
</appSettings>

To access the values you make use of the ConfigurationManager class.  To get access to the ConfigurationManager please make sure you add a reference to your project for System.Configuration and the following using statement.

using System.Configuration;

Once those two items are in place you can start accessing items in your config file with the following syntax.

namespace AppConfigExample
{
    class Program
    {
        static void Main(string[] args) {
            DateTime lastRunTime = DateTime.Parse(ConfigurationManager.AppSettings[“lastRunTime”]);
        }
    }
}

This returns the string value in your config file so you may need to cast it depending on the datatype you want to work with.  For example our lastRunTime is a DateTime so I could cast the value as follows.

DateTime lastRunTime = DateTime.Parse(ConfigurationManager.AppSettings[“lastRunTime”]);  //please add error handing to production code

This gives you a simple tool to store basic configurations for your program.  On to the next step…

Updating and Saving Configurations

In the previous example we had a setting for last run time.  If this setting is going to be correct we will need to update the config file every time the application runs.  Below is the code that will load the application configuration into a variable you can work with, update the lastRunTime setting to the current date, and save the file.

namespace AppConfigExample
{
    class Program
    {
        static void Main(string[] args) {
            Configuration appConfig = ConfigurationManager.OpenExeConfiguration(Environment.GetCommandLineArgs()[0]);
            appConfig.AppSettings.Settings[“lastRunTime”].Value = DateTime.Now.ToString();
            appConfig.Save(ConfigurationSaveMode.Modified);
        }
    }
}

OpenExeConfiguration needs the exe name for the application so it can pull the correct config file.  A generic way to get the exe name is to use Environment.GetCommandLineArgs()[0].  That way if you rename your application your code will continue to work.

Summary

These two options should give you what you need to read and write simple configurations for your console applications.  The config files for .net do have more information than a traditional ini file, but if you stick to working with the appSettings section you should not run into any issues.

Synchronizing SQL Logins

Update 2017-06-20

This does not work on Sql Azure. I believe the replacement is

alter user

Original Article

Do you ever move a database from one server to another?  If you do chances are your user ids will get out of sync since the access is granted to a sid instead of a username.  If after restoring your database you cannot login you can run the following command to see a list of orphaned user ids in your database.

sp_change_users_login ‘report’

Once you see the name of the orphaned user you can choose a user on the new server to connect it to. Run the following script to link the old user to the new user.

sp_change_users_login ‘update_one’,’OriginalUserFromFirstServer’,’DestinationUserOnNewServer’

I normally like these user names to match so the second and third arguments are almost always the same.

Using C# Return Codes in Batch Files

Its been common in my experience to use batch or command files for automation of simple tasks.  Sometimes you need just a little more flexibility than the batch language has.  One way to deal with this is to write a command line program to handle the extra work.  Since error levels can be used in batch files to control flow it would be nice to be able to communicate the success or failure to of the command line program back to the batch file.  It turns out this is really easy.  Below is the basic command line program you get from visual studio.

namespace ConsoleApplication1
{
    class Program
    {
        static void Main(string[] args) {
        }
    }
}

The main function has a return type of void.  If we change that to int then we have the opportunity to give some information back to the batch file.  The example below has the return value changed and does a simple comparison to see which number to return to the batch file.

namespace AppExitTest
{
      class Program
      {
            static int Main(string[] args) {
                  int returnVal = 0;
                  if(args[0] == “true”) {
                        returnVal = 23412341;
                  }
                  return returnVal;
            }
      }
}

This returns an int which can be read out of the %ERRORLEVEL% variable in a batch file.  Below is a batch file which demonstrates both paths in the command line program.

echo off
appexittest.exe false
echo %ERRORLEVEL%
appexittest.exe true
echo %ERRORLEVEL%

This batch file gives the result:

echo off
0
23412341

Using pool.ntp.org as Your External Time Source

We recently ran into a situation that required our time be very close to everyone else in the world so we began to work on a solution to make sure all our equipment was using current ntp sources.  We have two basic items to consider, windows servers and cisco asa appliances.  Both are discussed below.

Windows Servers (verifed on 2003 and 2008R2)

There are two variations (part of a domain and stand alone) in servers we looked at but they both have basically the same answer.  Internal servers joined to a domain will get their time from one of the domain controllers so if the domain controllers are correct all the other servers will be as well.  Non domain servers will all have to be configured to an authoritative source individually.

Step 1 - Find The Domain Controller All the Other Domain Controllers are Referencing

According How the Windows Time Service Works.aspx) the head of the time tree should be the PDC emulator.  In our case it was and if you want to be sure you can run the following command which will produce something similar to the output below, depending on the number of domain controllers you have in your domain.  This example contains four domain controllers.

w32tm /monitor
maindomaincontroller.company.com PDC [10.10.0.10:123]:
    ICMP: 0ms delay
    NTP: +0.0000000s offset from maindomaincontroller.company.com
        RefID: maindomaincontroller.company.com [10.10.0.10]
        Stratum: 1
secondarydomaincontroller1.company.com PDC [10.11.0.20:123]:
    ICMP: 46ms delay
    NTP: -0.0102363s offset from maindomaincontroller.company.com
        RefID: maindomaincontroller.company.com [10.10.0.10]
        Stratum: 2
secondarydomaincontroller2.company.com PDC [10.12.0.12:123]:
    ICMP: 46ms delay
    NTP: +0.0249849s offset from maindomaincontroller.company.com
        RefID: maindomaincontroller.company.com [10.10.0.10]
        Stratum: 2
secondarydomaincontroller3.company.com PDC [10.10.0.11:123]:
    ICMP: 0ms delay
    NTP: -0.0057875s offset from maindomaincontroller.company.com
        RefID: maindomaincontroller.company.com [10.10.0.10]
        Stratum: 2

If you notice on line five this domain controller is referencing its self for time.  This means you are not using an external time source and the listed domain controller is the one you need to modify.

Step 2 - Finding an External Time Source

We found two options for this and actually ended up using both. 

Option 1 is the ntp.org pool.  This project allows people to donate server time to serve as ntp servers all over the world.  This gives you access to server geographically located near you so you can cut down on network lag which can affect your abilty to keep your time correct.  Since this project has many redudant nodes we decided it would be our first choice for an NTP source.   See the “use” page for determining the DNS names you should use. 

Option 2 is the time servers provided by NIST.  These servers are considered reliable since they use the U.S. naval atomic clock to keep time but have a much smaller number of servers avalible as compared to the ntp.org pool.  The names and IP addresses are here.

Step 3 - Configure Your Server to Use the New Time Source

Changing domain controllers and stand alone servers requires the same command.  We used the one below which works on Server 2003 and 2008.  The first command we found on the ntp.org pool site only worked on Server 2003.  Also, please make sure you select appropitate DNS records, the ones in this command are best suited for use in the United States.

w32tm /config /syncfromflags:manual /manualpeerlist:”0.us.pool.ntp.org 1.us.pool.ntp.org 2.us.pool.ntp.org 3.us.pool.ntp.org” /reliable:YES

After running this command you should be able to run the command from step 1 and see the updated time server.  You may also note your statums have changed denoting how many levels away from the root source you are. 

w32tm /monitor
maindomaincontroller.company.com PDC [10.10.0.10:123]:
    ICMP: 0ms delay
    NTP: +0.0000000s offset from maindomaincontroller.company.com
        RefID: externaltimesource.com [171.10.10.10]
        Stratum: 3
secondarydomaincontroller1.company.com PDC [10.11.0.20:123]:
    ICMP: 46ms delay
    NTP: -0.0102363s offset from maindomaincontroller.company.com
        RefID: maindomaincontroller.company.com [10.10.0.10]
        Stratum: 4
secondarydomaincontroller2.company.com PDC [10.12.0.12:123]:
    ICMP: 46ms delay
    NTP: +0.0249849s offset from maindomaincontroller.company.com
        RefID: maindomaincontroller.company.com [10.10.0.10]
        Stratum: 4
secondarydomaincontroller3.company.com PDC [10.10.0.11:123]:
    ICMP: 0ms delay
    NTP: -0.0057875s offset from maindomaincontroller.company.com
        RefID: maindomaincontroller.company.com [10.10.0.10]
        Stratum: 4

Step 4 - Verify Your New Time Source Is Working

If you like you can wait for your time to sync by itsself but if you restart the windows time service it should sync immediatly.  If you do not get the correct time make sure your timezone is correct and your clock is not more than a few minutes off from the time the external server has.  If its too far out of sync the windows time service will not change the time.

Cisco ASA Appliances

After doing all the leg work on the windows server front we thought it would be easy to set the NTP setting on the ASA.  The only snag we ran into was the firewall will not take a DNS name as its NTP server.  Since we had to use an IP address we elected to go with servers from the NIST list as people participating in the ntp.org pool can choose to leave at anytime and the current IP address being served by the DNS name may not always be a time server.  Screen shots of the config will have to wait for a later post. 

Other Reading: